What is an Audio Interface and How Does it Work?
An audio interface is a crucial device for anyone involved in music production, podcasting, or live streaming. It connects your musical creations to your computer, allowing you to record by converting analog signals into digital signals. These interfaces utilize A/D and D/A converters to ensure high-quality digital audio, offering various connection formats, microphone preamps, and signal conditioning to optimize sound quality.
In the 2000s, advancements in connectivity technologies significantly improved audio interfaces. The introduction of Thunderbolt technology during this period had a substantial impact, providing faster data transfer rates and lower latency, which enhanced the performance and reliability of audio interfaces.
Historical Evolution of Audio Interfaces
The history of audio interfaces is a fascinating journey that mirrors the evolution of digital recording technology. In the 1980s, the first audio interfaces emerged, allowing musicians to connect their instruments to computers and record digital audio. These early devices were often bulky, expensive, and limited in functionality, but they laid the groundwork for future innovations.
The 1990s saw a significant leap forward with the advent of USB technology. USB audio interfaces became smaller, more affordable, and user-friendly, democratizing digital recording and making it accessible to a broader range of musicians. This era marked the beginning of a more inclusive music production landscape.
The 2000s brought further advancements with high-speed USB and FireWire interfaces, which enhanced the quality and reliability of digital recordings. These interfaces offered higher sample rates, lower latency, and improved sound quality, catering to the growing demands of professional studios and home recording enthusiasts alike.
Today, audio interfaces continue to evolve, incorporating cutting-edge technology to meet the needs of modern music production. High-speed USB-C connectivity, 32-bit recording quality, and advanced preamps are now standard features in many interfaces. The rise of mobile recording has also led to the development of compact, bus-powered interfaces that offer professional-grade sound quality on-the-go. As technology advances, audio interfaces will undoubtedly continue to push the boundaries of what’s possible in digital recording.
Benefits of Using an Audio Interface with Cubase
Using an audio interface with Cubase (and all DAWS in general) enhances your music production experience by providing low latency performance, detailed sound, and high-quality audio recording. These devices serve as a bridge between real-world (acoustic) sounds and the digital realm, making them indispensable for music creators and home studios. They come equipped with features like mic pres, instrument inputs, and headphone outputs to elevate your audio performance.
Choosing the Best Audio Interface for Your Needs
When selecting an audio interface, consider your specific needs, budget, and the nature of your work. Look for robust ASIO driver support to ensure low latency performance and superior sound quality. Key factors include the number of inputs and outputs, mic/instrument/line level inputs, preamp, phantom power capabilities, and maximum sample rate and resolution.
Additionally, consider interfaces with built-in DSP effects for real-time processing.

Budget Considerations and Cost-Effectiveness
When selecting an audio interface, budget is a crucial factor to consider. Audio interfaces can range from under $100 to over $1,000, with varying features and quality levels to match different needs and financial constraints.
For beginners, a budget-friendly audio interface in the $100-$300 range is often a great starting point. These interfaces typically offer essential features such as 2-4 input channels, 24-bit/96kHz resolution, and USB connectivity. They provide a solid foundation for those new to recording audio, allowing users to compose music and experiment with basic setups without breaking the bank.
Intermediate users might look at mid-range interfaces priced between $300 and $600. These models generally offer enhanced sound quality, additional input channels, and extra features like MIDI connectivity and phantom power. This price range is ideal for musicians who have some experience and are looking to expand their recording capabilities.
Professional users often require high-end audio interfaces in the $600-$1,000 range. These interfaces come equipped with advanced features such as high-speed USB-C connectivity, 32-bit recording quality, and premium preamps. They are designed to meet the rigorous demands of professional studios, ensuring top-tier audio performance and detailed sound.
Ultimately, the cost-effectiveness of an audio interface depends on your specific needs and budget. It’s essential to research and compare different options to find the best value for your money, ensuring you get the right audio interface that meets your recording and production requirements.
Audio Interface Features to Consider
- Number of inputs and outputs: Assess the number of instruments and microphones you need to connect.
- Mic preamps: High-quality preamps are essential for handling a range of instruments and microphones.
- Headphone output: Look for quality and power in the headphone output for accurate monitoring.
- Installation process: Choose interfaces with easy installation and user-friendly software.
- Room mic: Consider your recording environment and the interface’s ability to manage the noise floor.
- Phantom power: Essential for powering condenser microphones.
- MIDI connectivity: Useful for integrating external MIDI instruments and controllers.
Compatibility with Different Operating Systems
Ensuring compatibility with your operating system is a vital step when choosing an audio interface. Most modern audio interfaces are designed to work seamlessly with various operating systems, including Windows, Mac, and iOS. However, compatibility can vary depending on the specific interface and the version of the operating system.
For instance, most audio interfaces are compatible with Windows and macOS, so it’s always best to check the manufacturer’s website for the most accurate and up-to-date compatibility information.
Popular audio interfaces known for their broad compatibility include the Focusrite Scarlett series, PreSonus AudioBox series, and Native Instruments Komplete Audio 1 and Universal Audio. These interfaces are designed to work with Windows, Mac, and iOS, providing flexibility for users who may switch between different platforms.

Top Picks for Audio Interfaces
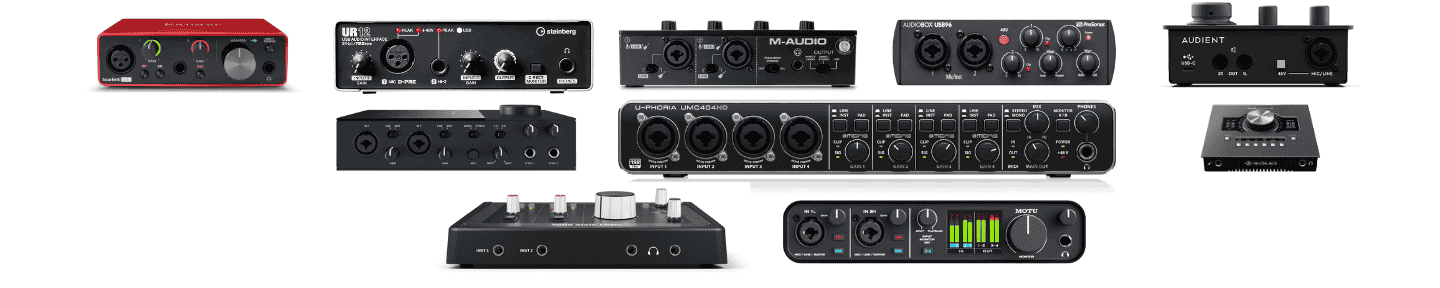
Focusrite Scarlett Solo
The Focusrite Scarlett Solo is a go-to choice for solo artists and small-scale producers looking for high-quality audio recordings. It features one XLR input for microphones and one line input for instruments, each equipped with Focusrite’s award-winning 3rd-generation preamps. The interface supports a 24-bit/192 kHz sample rate for crystal-clear audio fidelity. Its USB-C connectivity ensures fast data transfer, and its direct monitoring function eliminates latency during recording. With plug-and-play compatibility with Cubase, it’s also bundled with software like Ableton Live Lite and Focusrite’s plugin suite, the Scarlett Solo is perfect for streamlined project workflows.
Steinberg UR12
Designed by the creators of Cubase, the Steinberg UR12 offers seamless integration with the DAW. The UR12 is equipped with a single D-PRE mic preamp for studio-grade quality and one Hi-Z input for instruments like guitars. It supports up to 24-bit/192 kHz audio resolution, ensuring pristine sound. This USB-powered interface has RCA line outputs and a headphone jack for monitoring. Additionally, it’s compatible with Steinberg’s dspMixFx software for real-time onboard effects like reverb and compression, which enhance the recording experience in Cubase. Its rugged metal chassis makes it reliable for both home and on-the-go use.
M-Audio M-Track Duo
Perfect for beginners, the M-Audio M-Track Duo offers an entry-level package with surprising features. It includes two combo XLR/TRS inputs compatible with both microphones and instruments. Each input is powered by Crystal preamps, enhancing clarity and warmth in recordings. The interface supports up to 24-bit/48 kHz resolution and features a USB-powered design for convenient portability. With zero-latency direct monitoring and compatibility with Cubase, this unit is ideal for songwriters testing ideas or quickly recording demos. Additionally, the included software bundle features DAWs and virtual instruments, giving users more creative flexibility.
PreSonus AudioBox USB 96
Compact, rugged, and highly efficient, the PreSonus AudioBox USB 96 is built for both live and studio performances. Featuring two combo mic/instrument inputs with preamps delivering clean gain, it supports a professional-grade 24-bit/96 kHz resolution. Its MIDI I/O adds flexibility in integrating external instruments, and its low latency performance guarantees smooth monitoring when recording in Cubase. The USB 2.0 bus-powered design requires no external power supply. It works seamlessly with PreSonus’s Studio One software, but it’s also fully compatible with Cubase, making it a flexible choice for producers.
Audient iD4 MKII
The Audient iD4 MKII stands out due to its superior audio quality, offering a professional-grade experience for small studios. It brags a world-class Audient mic preamp, delivering the clean, transparent sound Audient is known for. The JFET DI input is perfect for guitar and bass, emulating the warmth of a valve amplifier. Supporting a 24-bit/96 kHz resolution, it ensures clear and detailed audio. With USB-C connectivity and ultra-low latency drivers, the iD4 MKII integrates smoothly with Cubase, allowing users to monitor their recordings with minimal delay. The ScrollControl feature lets you control DAW parameters directly from the interface, enhancing workflow efficiency.
Behringer UMC404HD
The Behringer UMC404HD offers impressive versatility for its price. Featuring four Midas-designed XLR/TRS combo inputs and preamps, it delivers clean, high-gain audio recording. The Midas preamps are renowned for their exceptional audio quality and reliability, ensuring professional-grade sound. With 24-bit/192 kHz resolution and ultra-low latency performance, it’s perfect for Cubase users who prioritize precision. Outputs include four line outs and inserts for external processing gear, providing great routing flexibility. Its multiple LED indicators for signal monitoring make it extremely user-friendly, while its rugged metal chassis ensures durability. Whether you’re recording a full band or working on layered studio productions, the UMC404HD handles it all.
SSL 2+
Targeted at pro-level production, the SSL 2+ is equipped with two SSL-designed mic preamps offering ultra-clean gain and analog warmth, which is especially useful for vocals. Its standout ‘Legacy 4K’ feature boosts high frequencies and adds subtle analog character to recordings, emulating iconic SSL consoles. Outputs include two headphone jacks and four RCA line outs, ideal for flexible monitoring configurations. Supporting 24-bit/192 kHz and ultra-low latency, the SSL 2+ aligns perfectly with Cubase’s advanced recording capabilities. Included production tools like SSL Native plugins make it a powerhouse for seasoned professionals.
MOTU M4
The MOTU M4 is recognized for its ultra-low latency performance and premium sound. Featuring two mic/line/instrument hybrid inputs and additional line inputs on the rear, the M4 handles multitrack setups with ease. Its ESS Sabre32 Ultra DAC technology provides an unparalleled 120 dB of dynamic range and pristine audio fidelity. Supporting 24-bit/192 kHz and armed with USB-C connectivity, it ensures seamless integration with Cubase. The built-in color LCD allows for real-time level monitoring, which streamlines the production process for producers who value precision.
Native Instruments Komplete Audio 6
The Native Instruments Komplete Audio 6 is a robust and versatile interface for music producers and sound designers. With four analog inputs (two XLR/TRS combo and two line inputs) and four outputs, it facilitates seamless workflow for complex audio setups. Its dual headphone outputs provide individual mixes for collaborative projects. The interface delivers 24-bit/192 kHz resolution and low-latency performance, ensuring compatibility with Cubase’s advanced features. Bundled with essential production tools like Reaktor Prism, Ableton Live Lite, and Maschine Essentials, the Komplete Audio 6 offers a complete solution for modern productions.
Apollo Twin X
The Apollo Twin X offers top-of-the-line audio conversion with its Unison technology, allowing for real-time emulations of classic preamps and compressors. This makes it a great choice for producers looking to achieve a vintage sound in their recordings. It also supports Apollo Monitor Correction provided by Sonarworks®.
Each of these audio interfaces offers unique features tailored to different use cases, ensuring that Cubase users can find the perfect match for their recording and production needs.
Comparison Table
For your convenience, here’s a comparison table for easy reference.
| Audio Interface | Inputs/Outputs | Price Range | Main Features |
|---|---|---|---|
| Focusrite Scarlett Solo | 1 input / 1 output | $120–$150 | 1 XLR input, 1 instrument input, 24-bit/192 kHz resolution, USB-C connectivity, low-latency design, bundled software. |
| Steinberg UR12 | 1 input / 2 outputs | $100–$130 | D-PRE mic preamp, Hi-Z input, 24-bit/192 kHz resolution, USB-powered, real-time effects, Cubase integration. |
| M-Audio M-Track Duo | 2 inputs / 2 outputs | $70–$100 | 2 XLR/TRS inputs, Crystal preamps, 24-bit/48 kHz resolution, zero-latency monitoring, includes DAW and virtual instruments. |
| PreSonus AudioBox USB 96 | 2 inputs / 2 outputs | $90–$130 | 2 XLR/TRS combo inputs, MIDI I/O, 24-bit/96 kHz resolution, bus-powered, Studio One Artist DAW software included. |
| Audient iD4 MKII | 2 inputs / 2 outputs | $200–$250 | 1 XLR input, JFET DI input, world-class preamp, 24-bit/96 kHz resolution, ScrollControl for DAW parameters, USB-C. |
| Behringer UMC404HD | 4 inputs / 4 outputs | $120–$150 | 4 Midas preamps, 24-bit/192 kHz resolution, ultra-low latency, inserts for external gear, durable build, flexible routing. |
| SSL 2+ | 2 inputs / 4 outputs | $250–$300 | SSL mic preamps, ‘Legacy 4K’ mode for analog warmth, dual headphone jacks, 24-bit/192 kHz resolution, includes plugins. |
| MOTU M4 | 4 inputs / 4 outputs | $220–$280 | ESS Sabre32 Ultra DAC, color LCD for level monitoring, 24-bit/192 kHz resolution, low-latency performance, USB-C. |
| Native Instruments Komplete Audio 6 | 4 inputs / 4 outputs | $230–$300 | Dual headphone jacks, MIDI I/O, 24-bit/192 kHz resolution, low-latency, included production tools like Reaktor Prism. |
| The Apollo Twin X | 10 inputs / 6 outputs | $1,400–$1,600 | 2 Unison-enabled mic preamps, 1 Hi-Z input, 24-bit/192 kHz resolution, Thunderbolt 3 connectivity, QUAD Core UAD processing, real-time analog emulations, ADAT optical input, bundled UAD plug-ins, expandable with other Apollo devices. |
This comparison table aims to give you a clear breakdown of the inputs/outputs, price range, and primary features for each interface for your Cubase. It outlines the key advantages of each option, making it easier for users to select one that fits their needs and budget.
Setting Up and Using Your Audio Interface with Cubase
To set up your audio interface with Cubase, follow these steps:
- Install Drivers and Software:
- First, ensure that you have installed the latest drivers and any necessary software for your audio interface. You can usually find these on the manufacturer’s website.
- Connect the Audio Interface:
- Use the appropriate cable (USB, Thunderbolt, etc.) to connect your audio interface to your computer.
- Power On:
- If your audio interface has a power switch, make sure it is turned on.
- Open Cubase:
- Launch Cubase on your computer.
- Select the Audio Interface:
- Go to Studio > Studio Setup.
- In the Studio Setup window, select VST Audio System from the list on the left.
- In the right pane, choose your audio interface from the ASIO Driver dropdown menu.
- Configure Inputs and Outputs:
- Still in the Studio Setup window, click on Audio Connections (or press F4).
- Set up your input and output buses. Click on the Inputs and Outputs like your tabs to add or configure the buses according to your audio interface’s capabilities.
- Test the Connection:
- Create a new project or open an existing one.
- Add an audio track and select the appropriate input channel.
- Test the connection by playing an instrument or speaking into a microphone connected to the interface. You should see the input levels moving in Cubase. If you also enable direct monitoring, you should hear the input signal through your studio monitors.
- Adjust Buffer Size (Optional):
- If you experience latency, you can adjust the buffer size in the audio interface’s control panel. Lower buffer sizes reduce latency but may increase CPU load.
Finding it challenging? Consider signing up for the exclusive Cubase Course I’ve designed just for you.
Tips for Getting the Best Sound Quality
- Use high-quality microphones and instruments to capture the best sound.
- Adjust the gain levels and settings on your audio interface for optimal sound.
- Use studio monitors for accurate sound monitoring and adjustments.
- Consider using a USB hub to connect multiple devices to your computer.
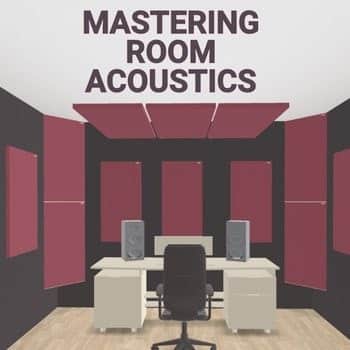
- Consider treating your room acoustics and calibrating your speakers as detailed here.
Common Mistakes to Avoid
- Overlook room acoustics and noise floor when choosing an audio interface.
- Failing to adjust the gain levels and settings on your audio interface.
- Using low-quality microphones and instruments.
- Not monitoring your sound accurately with studio monitors.
How I Tested
In this evaluation of audio interfaces for Cubase, I conducted comprehensive tests focusing on key factors such as sound quality, user-friendliness, latency performance, and overall compatibility with Cubase. I tested each interface in practical recording situations, including vocal, acoustic, and electronic instrument capture, to gauge their clarity and preamp efficiency.
Latency was measured during live monitoring and playback to ensure seamless synchronization with Cubase’s workflow. I also assessed their setup procedures, connectivity features, and integration with plugins and MIDI controllers, emphasizing how smoothly they operated within the DAW.

Conclusion
Choosing the right audio interface for Cubase is vital for everybody who wants to achieve high-quality recording and music production. Before everything, consider your specific needs, budget, and type of work when selecting an audio interface. Look for robust ASIO driver support, high-quality preamps, and easy installation and use. By following these tips and avoiding common mistakes, you can achieve professional-sounding audio with your audio interface and Cubase.
Suggested Reading
The Best Music Recording Software for Every Aspiring Musician
Practice and Enjoy!